
Raidmax Blackstorm Smilodon Gaming Chasis Black
Availability: Phased Out
Pay only P 461 a Month for 12 months.
Or pay only P 873 a Month for 6 months.
- Installment promo is available for locally issued credit cards
- Card holder must transact inside an Asianic store to avail of the installment
Features
The BLACKSTORM case makes assembling a system easier than ever before. It has a modular, tool-less design that makes the initial build and future upgrades easy. Both side panels latch into place for easy access. If you are a big fan of Smilodon then you shall never miss Blackstorm, the latest version of one-click side panel case. A 120mm fan is mounted on the front of the case to draw cool air in and blow it across the hard drives. Side 180mm optional and rear mounted 120mm fans keep the air moving over all critical components. Keep it cool and keep it functional.
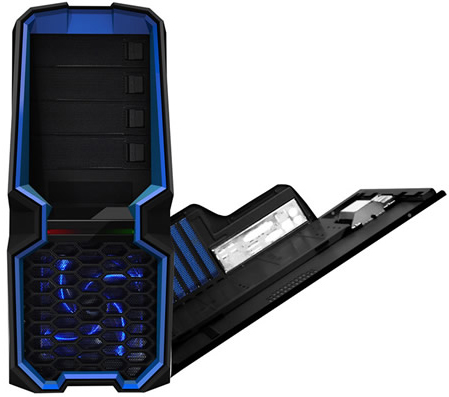
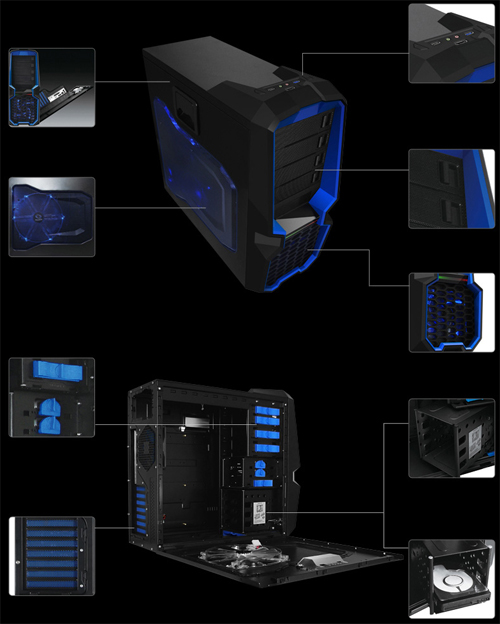
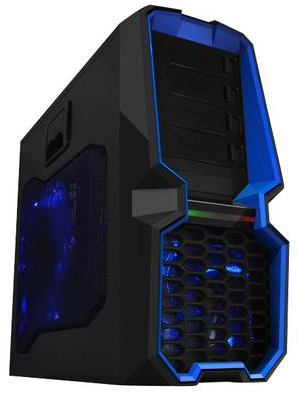
Fully exposed the Raidmax Blackstorm certainly has style with its black exterior and blue accents. The blue trim around the front is a nice touch and helps blend the transition from the top bays to the bottom fan. Looking at the Blackstorm from the front and back it get a better view of the nice blue accents. These subtle color touches really make the case pop. The rear PCI-brackets are very nice . The side panels of the case are rather interesting. A unique mesh window is placed on the access panel that holds a single, blue LED 180 mm fan. This fan provides cool air for the CPU and GPU areas. While the other side panel is seemingly uninteresting from this perspective, we'll find out its secrets soon enough. Lastly pictured is the case handle, which is a welcome addition. They come in handy when moving the case around because when pressure is applied straight up the latch does not engage; pulling the handles outward does release the panel.
Zoom in on the front of the case. The top four bays are standard
5.25" optical bays, the inserts are simply removed by pressing the tab on one
side and pulling out. Dust filters have been placed on each of these but are not
the easiest to clean. Below the bays is a single 120 mm fan to provide cool air
across the internal hard drive rack. To get a better picture of things I pulled
on the front of the case and released the plastic cover to reveal the fan and
the interesting hard drive activity and power LED details. Just above the 120 mm
fan there is a small flat area that holds the LEDs, these activity lights are
discolored from the case appearing as green and red. The front 120 mm fan does
have a dust cover but it is screwed into the mesh and not removable for proper
cleaning.
At the bottom of the case are seven expansion slot covers, which are perforated and painted with the case's accent blue. The center shows the second 120 mm fan coated in Raidmax blue, along the included, generic I/O panel. At the top of the rear is the power supply mounting area. A top mounted power supply may cause the case to become top heavy thus is more likely to tip over rather than a bottom mounted unit. The case is fairly standard in terms of external connectivity: two USB 2.0 ports, a single e-SATA port, and one mic and headphone jack each. Unfortunately the bottom is all black and does not have any pre-manufactured openings for additional fans or dust filters.
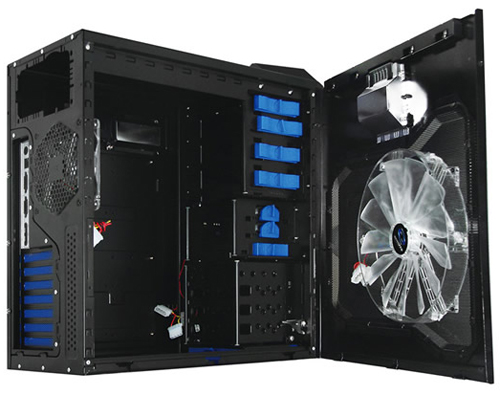
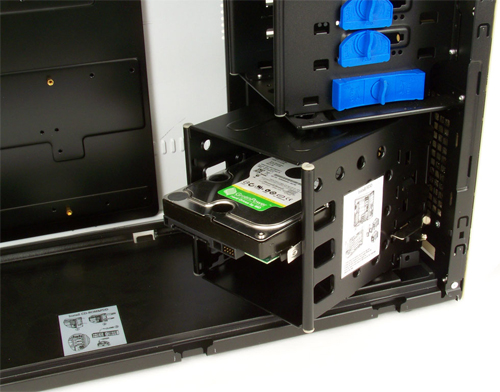
Opening the case panel we see the all black interior, which is a nice touch and contrasts the white exterior well. On the inside of the mesh panel you will find another fan of 200 mm diameter. 13 blades on the fan ensure that slow rotations per minute will still generate good air flow. On the right we have the back panel open and laid down. Raidmax has included a motherboard tray in the Blackstorm. It's held in place by the back panel but not by a hard mounting option like screws or clips. Here we have the inside front of the case. The top is lined with four 5.25" optical bay drives. Included below the optical drives are two 3.5" bays only one of which has access to the exterior front of the case. At the bottom Raidmax has equipped the Blackstorm with a removable hard drive bay: simply lift the latch and the bay swings out. With the bay removed we can view the front 120 mm fan which provides cool air across the hard drives and expansion cards.
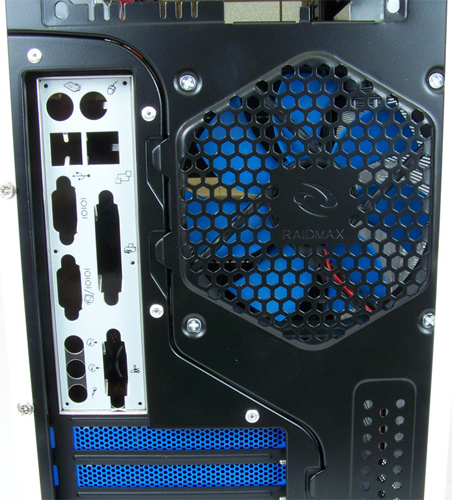
Continuing to the back of the inside of the case we have the seven blue expansion slot covers, which are nicely vented with tiny holes, which help maximize case air flow. The middle holds a nicely painted blue 120 mm fan, the fan is powered with a Molex connection. The top area is dedicated to the power supply mounting. There is a small stand to help hold smaller power supplies in place. When pulled the motherboard tray from the back panel, which makes it very easy to install a motherboard into a case. the small blue 80 mm fan holder placed on the back inside of the 3.5" drive bays. It's a nice thought to include the fan holder because when needed to remove the hard drive bay for a large graphics card it still have air flow over the hard drive(s). Last but not least, enclosed are the front panel cables. The power and reset switches are tied to the SATA, USB 2.0 and audio cables. The latter shows the hard drive activity and power wires which go to the LEDs just below the front 3.5" bay. The front 120 mm fan is also powered with a Molex connection.
The optical bay installation is fairly simple. First remove the front cover,
slide the drive in place, and then lock it in place with the easy turn locks.
The top optical bay was however the only one with the steel spacer removed. If
multiple drives were installed these would simply be bent until breaking the
connection with the sides. The hard drive was installed in the removable bay.
Only one hard drive was installed, but it was still nice to remove the bay and
install the drive before replacing the bay. Installing the mainboard was very
simple. With the tray removed from the back panel It was able to mount the
motherboard and then insert it in place with the back panel. With the main board
in place the Blackstorm starts to fill up, with not alot of room left over. With
the processor cooler and graphics card installed the case looks over-cramped and
messy. There just isn't enough room for much else. It's unfortunate that larger
graphics cards may not fit without removing the hard drive bay.
Case Material: SECC Steel
Black internal finish for sleek look
A 120mm fan on top panel to extract heat from chassis
Front mounted dual 120mm Blue LED fans cools your hard drive cordially
Rear 120mm fan circulates hot air throughout your chassis
See-thru side window panel with 120mm fan mounting space (optional)
Smart one-click 5.25" bay cover
Tool-Free installation for 5.25" Devices and 3.5" HDDs
Removable 2.5" / 3.5" HDD cage
Bottom PSU ventilation holes and removable dust filter for better cooling and
easy cleaning
Sufficient depth of chassis for installing long cards
A case cable management has simplified cable routing for computer
Dual tube outlets for future liquid cooling support
Front mounted USB 2.0, e-SATA and HD audio port provide easy accessibility to
your devices
9 Drive Bays (3 x 5.25", 4 x 3.5" hidden)
Dimension: 475 x 530 x 225mm (HxDxW)
Compatible Motherboards: Micro ATX, Standard ATX
Technical Specifications
| EXTERNAL DRIVE BAYS: | 4 X 5.25", 1 X 3.5" |
| INTERNAL DRIVE BAYS: | 5 X 3.5" H.D. |
| SYSTEM BOARD: | 10” X 12” MAX SIZE ATX FORM FACTOR / MICRO ATX |
| EXPANSION SLOTS: | STANDARD ATX 7 SLOTS |
| I/O PORTS: | 1 X USB3.0 + 1 X USB2.0/ 1 X e-SATA / 2 x AUDIO |
| DIMENSIONS: | 520(L) X 205(W) X 480(H)mm |
| COOLING SYSTEM | |
| FRONT: | 1 X 120mm blue LED fan |
| RIGHT SIDE: | 80mm Black Fan close to 3.5" bays rack (optional) |
| LEFT SIDE: | 1 x 120mm blue LED fan or 1 x 180mm blue LED fan (optional) |
| BACK: | 1 x 120mm Black frame with Blue leaves fan |
| TOP: | None |